Milling and Post-mill Processing of 3M Chairside Zirconia

By Dr. Michael Snider
Sponsored by 3M
In our last article, we dove into zirconia and its structure. We highlighted the properties that allow zirconia to be such a versatile dental restorative material. We also highlighted some of the properties of the 3MTM Chairside Zirconia, and what gives it the unique blend of functional strength and esthetics.
In this article, I would like to discuss the milling and post-mill processing of 3MTM Chairside Zirconia. To begin, the milling process of zirconia is quite a bit different than the grinding process that is used with chairside glass ceramics. The smaller diameter of the carbide burs used in the milling process, compared to the diamond burs used in the grinding process, allows for markedly less overmiling of the intaglio of the restoration. The overmiling phenomenon is highlighted by the images below. The crown was designed to go over a custom abutment. The restoration on the left shows the grinding process using the diamond burs. The restoration on the right shows the milling process using the carbide burs.
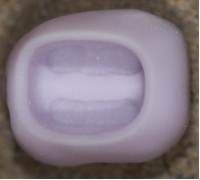
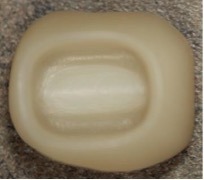
Figures 1a & 1b: Grinding vs. Milling Process
The milling process with zirconia is outstanding with the new Primemill from Dentsply Sirona. We have multiple milling options with the Primemill. There is Fast, Fine, and Extra Fine. I find myself using the fast mill option most of the time in practice for single units. However, when I am doing bridges, I usually find myself using the extra fine option. I prefer the extra fine setting for bridges because I can achieve more definition at the embrasures associated with the connectors. The images below compare the fast, fine, and extra fine milling of a single unit of 3MTM Chairside Zirconia.


Figures 2a, 2b & 2c: Fast, Fine, and Extra Fine milling of 3MTM Chairside Zirconia
As you can see from the images in Figure 2, there is a difference in the overall occlusal anatomy that is generated from the burs when extra fine milling is used. However, in my practice the ability to fast mill in roughly 5 minutes compared to the anatomy I receive from extra fine milling at 18 minutes is not relevant.


Figures 3a, 3b & 3c: Mill times of single unit at Fast, Fine, and Extra Fine Mill Settings
Regardless of the mill speed that is selected, the marginal integrity when milling zirconia is unrivaled. The softness of the material in the green state, combined with the carbide burs make for margins that are pristine. We do not see any chipping at the margin like we can see with some of the other glass ceramics when milling a fine margin.
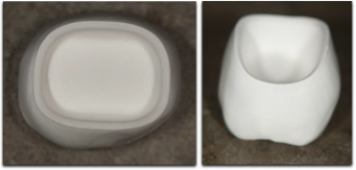
Figure 4: Margins of milled 3M Chairside Zirconia
In my practice, I try to keep the post mill processing of zirconia very simple for my team members. We first use a fine carbide bur to remove the sprue. Next, we use the Blue Twist Polisher from Meisinger to remove any of the superficial scratches left from the milling process. Then, it is important to remove any zirconia dust from the restoration. If any dust is left on the surface of the restoration, it will affect the esthetics of the final product when sintered.
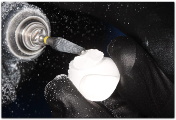
Figure 5: Removal of Sprue
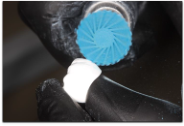
Figure 6: Prepolish with Blue Twist Polisher
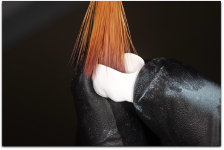
Figure 7: Removing the residual zirconia dust from restoration
Once cleaned, the restoration is then sintered in the SpeedFire Oven from Dentsply Sirona. The restoration is always placed occlusal side down. This takes into account the shrinkage that happens during the sintering process. We wouldn’t want our margins dragging against the firing pad as the restoration shrinks during sintering.
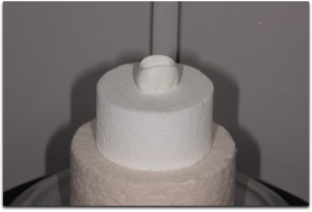
Figure 8: Placement of restoration for sintering
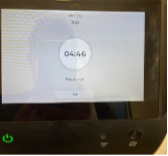
The technology of the SpeedFire Oven is what allows zirconia to now be a chairside restorative material. Before the SpeedFire Oven, the process of sintering zirconia would take multiple hours. Although it was a fantastic material, the long processing time made it useless in a chairside, same day, application. To now be able to sinter this material in roughly 20 minutes is an absolute game changer in chairside dentistry.
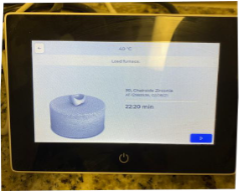
Figure 9: Sintering time of 3M Chairside Zirconia
In the photo below you can see the importance of the pre-polishing step. The crown on the left was not pre-polished and you can still see the horizontal striations left from the milling process on the buccal cusp. The crown on the right received the pre-polish and will be much easier to complete the post-sintering process.

Figure 10: Crown without prepolishing step (left) and crown with prepolishing completed (right)
In our practice, most of the single unit posterior 3MTM Chairside Zirconia are not glazed. We simply polish the restoration and then deliver it to the patient. My go to for final polish is the Yellow Twist Polisher from Meisinger.
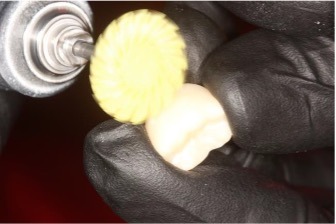
Figure 11: Final Polish of restoration with Yellow Twist Polisher from Meisinger
By using just three simple steps, we can fabricate predictable and esthetic restorations for our patients. I love the simplicity of the armamentarium that my team needs to process a zirconia restoration post-mill. It doesn’t require a lot of burs, glazes, stains, etc. It is just three burs as mentioned previously.
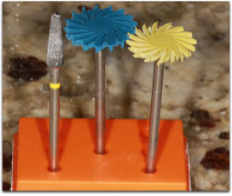
Figure 12: Armamentarium for Post Mill Processing of 3M Chairside Zirconia
In our practice, we almost exclusively polish zirconia, however glazing is also an option after the sintering process is completed. The restoration is mounted on one of the firing pins included with the SpeedFire Oven and then spray glaze can be added. The glazing cycle is quick, at only around 9 minutes. The key here is to apply a fine, even coat of glaze for the entire restoration. We do not want to see the glaze accumulating and becoming runny on the surface of the restoration.
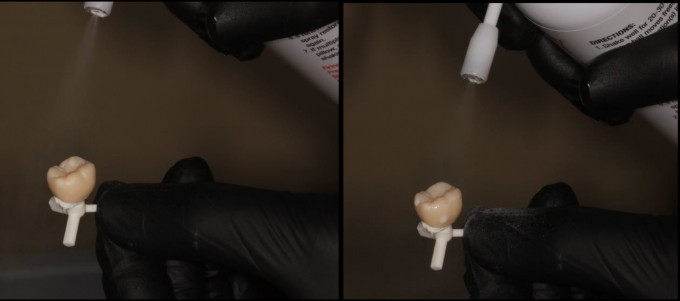
Figure 13: Appropriate glaze application (left) versus too much glaze application (right)
3MTM Chairside Zirconia is a material that offers me the esthetics I want and strength that I need in my posterior restorations. In the case below, the patient presented with a failing amalgam restoration on tooth #3. The decision was made to restore this case with a full coverage restoration. The ability to be conservative with preparations when using 3MTM Chairside Zirconia makes these cases simplistic. In the final image you can see the 3MTM Chairside Zirconia, adjacent to an e.max LT restoration on #4 and a porcelain fused to metal crown on tooth #5.
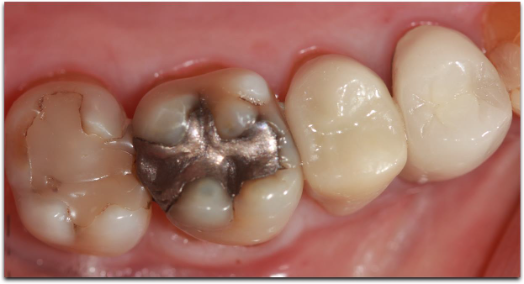
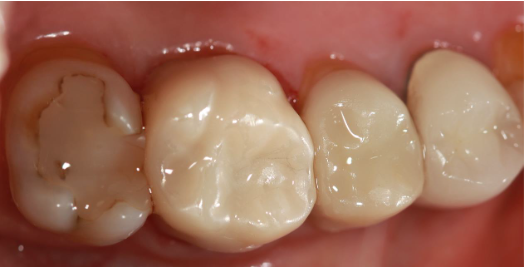
Figure 14: Before and After restoration of #3 with 3MTM Chairside Zirconia
Next time, we will discuss the delivery process of 3MTM Chairside Zirconia for our final article in the series. When to consider bonding the restorations and when to consider conventional cementation. The beauty of this material, especially when partnered with 3MTM ScotchbondTM Universal Plus Adhesive and 3MTM RelyXTM Universal Resin Cement, is the versatility in delivery options.
How are the infiltration results with 3m? Shape looks great, a bit pearly like some of the other blocks I've tried. I'm playing around with infiltration.
But then again who cares at the posterior we want strength
