Determining Vertical Dimension for Worn Dentition Case

One of the most difficult and misunderstood aspects of comprehensive dentistry is how to address the severely worn dentition. The patient who has worn their teeth so severely that both esthetics and function have been significantly compromised. We all want to help these patients, but we need a place to start. How do we determine what that starting point is? Can we open up vertical dimension or do we need to recommend orthodontics, crown lengthening, or all of the above? In this brief article and case study, we will discuss one method to determine a restorative position that “might” work.
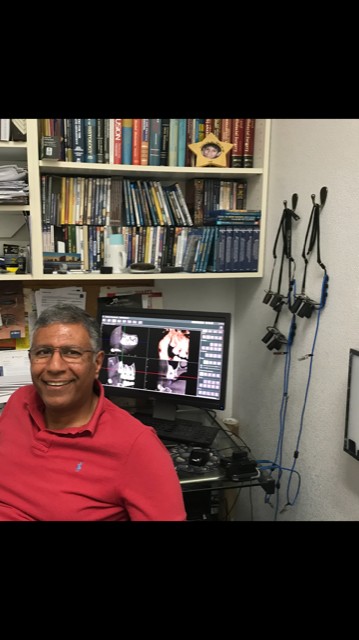
A patient presented into my office with the chief complaint that he had lost tooth #7 and was interested in an implant to replace the tooth. During the exam we noticed the extensive attrition and erosion present and significant loss of vertical dimension (Figures 1 and 2). After reviewing the clinical situation with the patient, he was interested in at least exploring the options to restore his bite. However, at this point we cannot definitely tell the patient what options are available, we need to collect some information and diagnostically work up the case to determine what is possible.
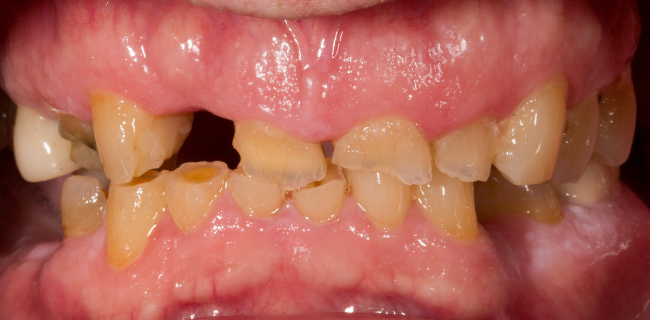
Figure 1: Preop closed.
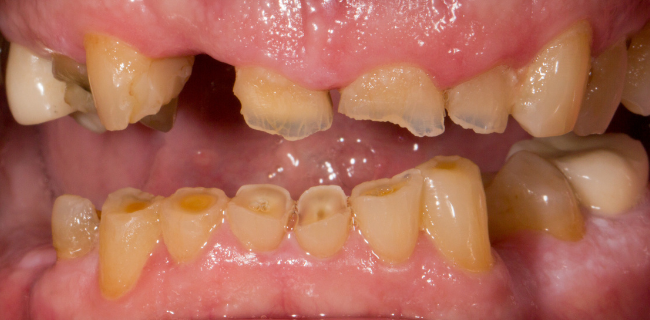
Figure 2: Preop open.
Before the patient left that day, we took a full series of photographs and an upper and lower scan of his teeth with the CEREC® Primescan. I had a suspicion that I would have the ability to lengthen his teeth and open his vertical dimension based on his lip at rest photo (Figure 3). How much I would need to open the vertical I did not know at this point.
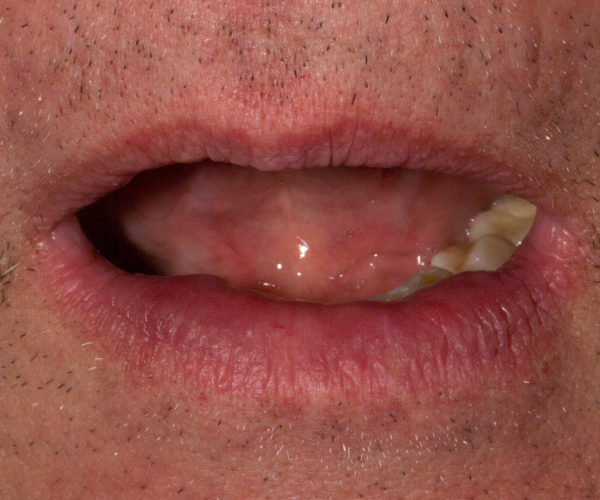
Figure 3: Lip at rest.
So here is an effective technique that can be used to determine a starting restorative position.
Step 1: Build up the upper and lower central incisors to correct proportions (in composites). I personally will start with the upper central incisors and create an ideal shape that establishes proper lip at rest tooth display. Once the uppers are done, I will mock-up the lower central incisors (Figure 4). These mock-ups do not have be perfect, but just establish a tooth position “base-line”
Figure 4: Composite Mockup on 8,9,24,25 Open.
Step 2. Have the patient close their teeth. This is new proposed vertical dimension... At this new position the patient should only be hitting on the central incisors. Anterior contact with no posterior contact should help the patient's condyle's seat and help them into a CR position. Using a Leaf Gauge with this anterior contact can also help the patient move into CR (Figure 5)
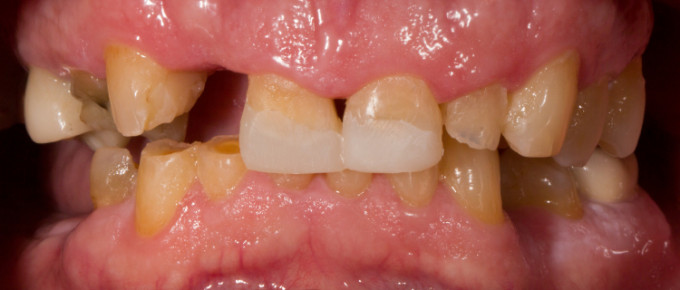
Figure 5: Composite Mockup on 8,9,24,25 closed.
Step 3: Having the patient in the new CR position with the anterior mock-ups holding this position (or you can hold via bite registration material), take the double buccal bite image to relate the upper and lower arch in the new vertical dimension.
Step 4: Lastly, before you remove the composite mock-ups, scan them in the Biocopy Folders with the Primescan.
Now that you have gathered all the information, you can tell the patient you will comprehensively mock-up the case (via digital wax-up) to see what is possible. We can schedule the patient for a second consult to discuss and finalize the plan.
Using inLab 20, we imported all the information gathered with the Primescan and did a full digital wax-up. Once completed, the wax was 3D printed and Copyplast templates were made to transfer the wax-up to the patients mouth and determine if this restorative position was going to work out.
Using Copyplast and Bis-Acryl, we transferred the wax-up to the mouth and the patient was quite pleased with the plan (Figures 6 and 7). This definitely created value for the patient to move forward with treatment and complete the case. Over the next month or so the entire case was completed using zirconia (Figure 8).
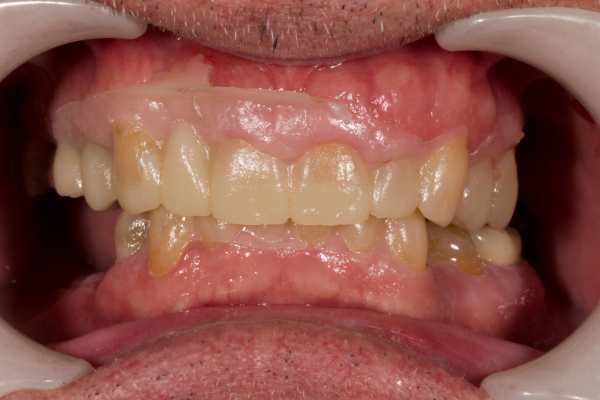
Figure 6: Waxup transfered in BisAcryl Closed.
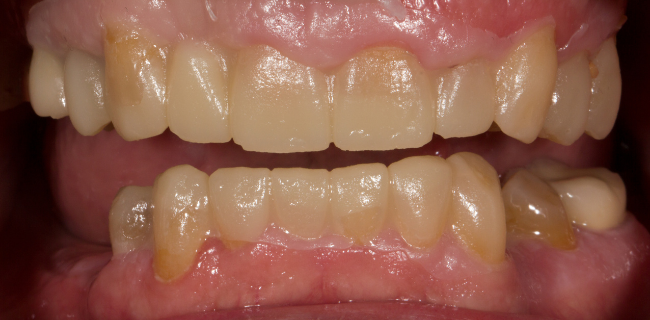
Figure 7: Waxup transferred in BisAcryl Open.
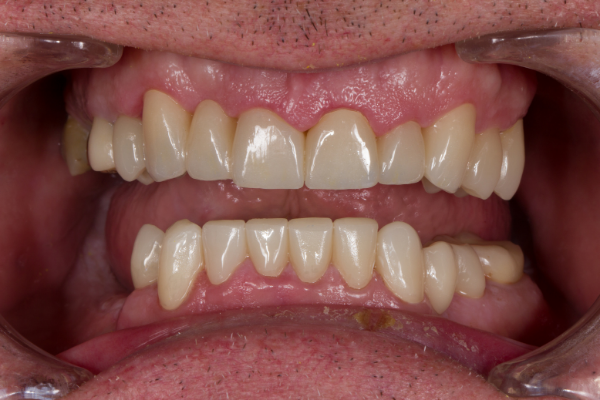
Figure 8: Final Result Zirconia.
Understanding how to address wear cases can be a daunting task. However, always remember that you simply need a starting point. The best way that I think about it is that esthetics is always the goal. Start with making the shape of the tooth ideal and try to develop function around that. Sometimes (like this case) you can do it entirely restoratively by increasing vertical dimension. Other times, building the tooth to the ideal position will result in 7mm tooth display at rest position... but that tells up important information in how to restore the case. That is, in many wear cases, orthodontics and/or crown lengthening is required.
Great case!
Just out of curiosity, how did the patient "feel" about the extended incisal edges (besides esthetics)? I mean in comfort level and how they felt when they "moved their jaws?"

Spear concepts at their most basic, but most important. Well presented.
Is there a final lip at rest photo to show the magic of positioning 8 & 9 first? That will help show why they need to be the first step.
On 4/20/2021 at 12:37 am, Alan Fujimoto said...Great case!
Just out of curiosity, how did the patient "feel" about the extended incisal edges (besides esthetics)? I mean in comfort level and how they felt when they "moved their jaws?"
He loves them. It was a very satisfying case because of the feedback from both the patient, but his family as well.
On 4/20/2021 at 2:02 am, Ernie Johnson said... Spear concepts at their most basic, but most important. Well presented. Is there a final lip at rest photo to show the magic of positioning 8 & 9 first? That will help show why they need to be the first step.
I don't have a final lip at rest, but he showed probably .5-1.0mm tooth at rest.

Very nice case. The true characteristic of a gifted teacher is the ability to communicate the complex and make it appear simple and easy. very well done!

Great work Mike! Question for you, with cases such as these, do you do sleep studies and look at Sleep Apnea before such a large case? Again, wonderful work and I am certain everyone that sees him gets to hear how great of a dentist you are, walking advertisements are always a good thing!

Nice workflow, Mike. Having done one of these before, I definitely learned a few pointers here. One question that doesn't require monetary specifics: Are you including the work it takes for the wax up at your diagnostic record appointment? Or was the patient already in at this point after you showed them what was possible on photoshop, etc? Seems like it would be pretty powerful to have them wear the mock up certainly. Thanks again.

On 4/27/2021 at 7:06 am, Ray Ortiz said...Nice workflow, Mike. Having done one of these before, I definitely learned a few pointers here. One question that doesn't require monetary specifics: Are you including the work it takes for the wax up at your diagnostic record appointment? Or was the patient already in at this point after you showed them what was possible on photoshop, etc? Seems like it would be pretty powerful to have them wear the mock up certainly. Thanks again.
Hi Ray-
If i'm sending out the waxup, I charge for it. In this case, I did the waxup myself.

Hey Mike. This is an amazing presentation and a great follow up on the level 4 courses. Thank you.
I’m beginning to like zirconia more and more and for cases like this I love the option of it in the anterior.
I try to shape all my anterior crowns like you taught us in the course, it’s been working great, with the grind zones, etc.
Any advice on shaping zr. I’m assuming you do the shaping in the white state? I find it challenging and trying to make it smooth without over polishing.
Any advice would be appreciated. What polishers do you suggest?
Thanks!